
Introduction
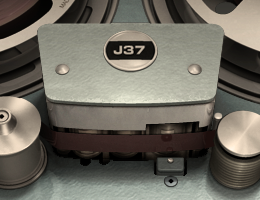
The Waves Abbey Road J37 Tape plugin is a meticulous software model of the Studer J37, the very-same 1-inch 4-track tape machine that famously recorded The Beatles’ Sgt. Pepper’s Lonely Hearts Club Band.
Developed in collaboration with Abbey Road Studios, (who had eight J37s at one point), the plugin lets modern producers and mixers tap into the legendary 1960s analogue sound within their DAWs. Waves teamed up with Abbey Road’s engineers to capture every nuance of their prime J37 unit – from its tube-driven circuitry to its idiosyncratic tape behaviour.

Launched in 2013 at a boom time for tape emulation plugins, the J37 distinguished itself by focusing on this single iconic machine’s sound, rather than a generic tape effect. At the time, other emulations like UA’s Studer A800 (released in 2010) or Slate’s VTM (released in 2012) were already popular, but Waves saw an opportunity to offer something special: the Abbey Road tape sound – historically the sound behind countless ’60s and ’70s classics.
The Studer machine was undoubtedly the best machine of its type in the world
Ken Townsend – Managing Director and Chairman of the EMI Studios Group, and the inventor of Artificial Double Tracking (ADT).
Priced for the plugin market and free from the maintenance headaches of real tape decks, the J37 plugin promised to ‘breathe new life’ into sterile digital recordings, adding the depth, warmth, and mojo of analogue tape in a convenient package. How does it deliver on that promise? Let’s explore the J37’s controls and character to find out.
Controls and Character
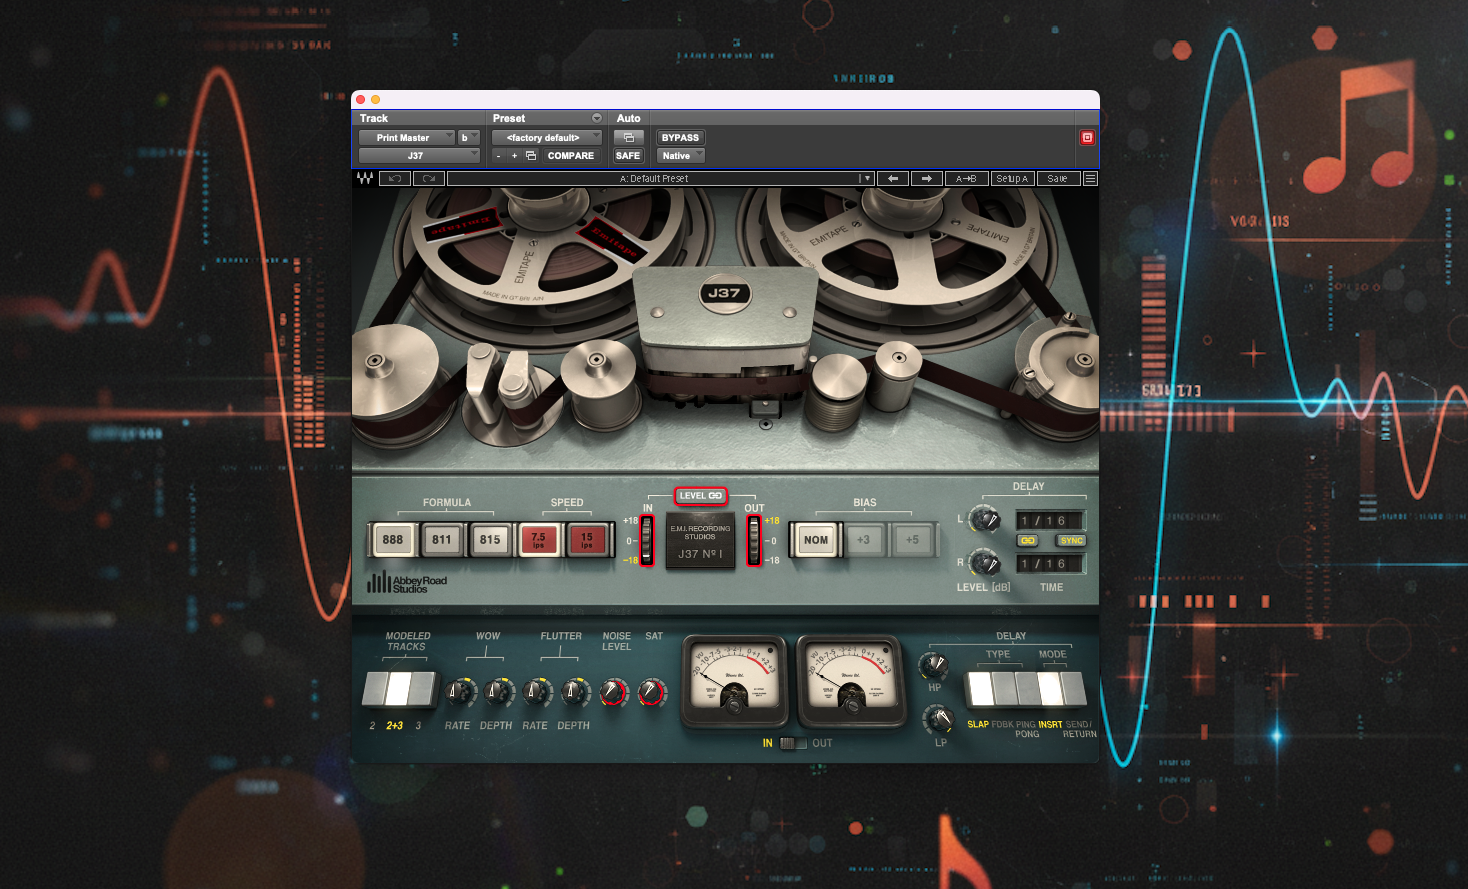
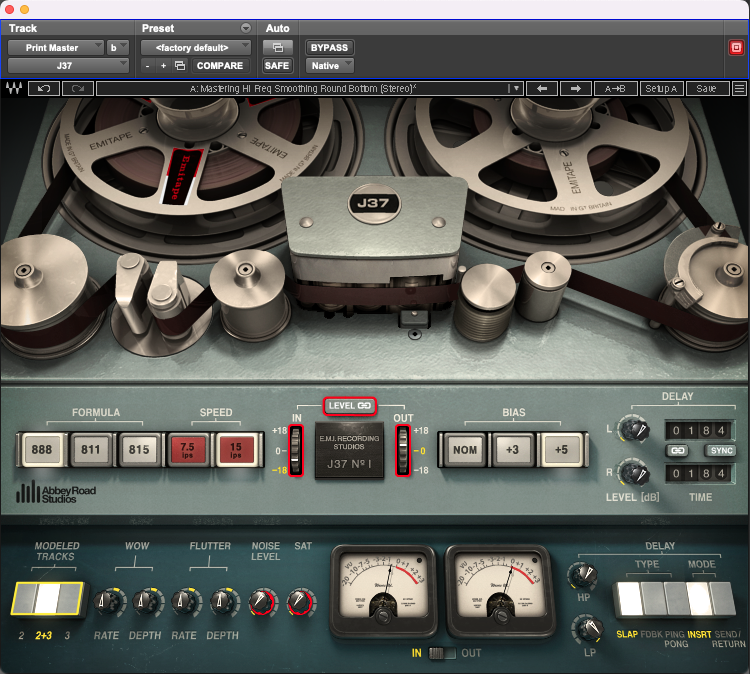
With the J37 Tape plugin’s design, Waves aimed to authentically recreate the features and sonic character of the legendary original hardware. Understanding the machine’s controls, and how they can shape your audio, is key to unlocking the plugin’s full potential.
We’ll take a look at the tape itself as well as the machine’s electronics, covering each aspect in detail: tape formulas, tape speed, input/output levels & saturation, headroom, bias, wow & flutter, and noise; and we’ll see whether the plugin nails the tape warmth & dynamic response so many of us seem to crave.
Tape Formulas; EMI’s Secret Sauce
One of the J37 plugin’s unique offerings is a choice of three EMI tape formulations, each from a different era, and with a distinct chemical makeup. These formulas – labelled ‘888’, ‘811’ and ‘815’ – originated from Abbey Road’s own tape stock in the late 1950s to the ’70s. In the plugin, selecting a tape formula changes the subtle frequency balance, saturation curve, and headroom characteristics that emulate those original tapes.

The EMI 888 formula (perhaps based on EMI’s ‘type 88’ PVC-backed tape from the late 1950s) is the grittiest of the three: it has a slightly ‘grainier’, more lo-fi tone reminiscent of the Beatles’ early recordings. The EMI 815 (1970s) is the most ‘hi-fi’ of the bunch – a relatively cleaner, more ‘sterile’ tape that introduced higher fidelity and less distortion as analogue technology improved, and the EMI 811 (late ’60s, the tape on which The Beatles’ Revolver album was recorded) offers a middle ground – a touch cleaner in the highs than 888, but still with some vintage distortion texture.
The differences are not night-and-day – in fact they’re pretty subtle, especially if you’re running the tape at high speed or you’re not pushing the input hard. Nonetheless, for the tone connoisseur, being able to switch tape formulas is like choosing between different EQ curves and saturation behaviors baked into the tape, and it’s a testament to Waves’ and Abbey Road’s attention to detail that the plugin captures these nuances to some degree.
Try 888 for an old-school 'grunge' on drums or guitars, 815 for a cleaner master bus glue, or 811 for something in between - and listen for differences in high-end roll-off and distortion warmth.
Tape Speed & Frequency Response
Just like the real Studer J37 reel-to-reel, the plugin lets you select tape SPEED in ips (inches per second) – either 7.5 ips or 15 ips.
Tape speed has a significant impact on frequency response and headroom. At 15 ips (the faster speed), you get better high-frequency reproduction and a generally ‘cleaner’ sound – effectively a more polished, high-fidelity result. In contrast, 7.5 ips (half the speed) extends the low-frequency response (a touch more bass heft) but at the cost of high-end clarity, yielding a darker, warmer tone often described as more ‘lo-fi’. The slower speed also accentuates tape saturation and distortion slightly, since tracking at this speed gives the tape more time to be magnetically imprinted, so you may hear a bit more ‘compression’ and coloration at 7.5 ips.

The J37 plugin reproduces these behaviours: for example, at 15 ips the hiss is lower and the treble is crisper, which might suit full mixes or when you want subtle tape cleanliness; and at 7.5 ips, you might notice a subtle rounding out of the low-mids and some rounding off of the highs, which can be great for individual tracks that need warming up or for taming the clinical presentation of a digital recording. Many engineers will choose 15 ips for mix buss or mastering duties (aiming for maximum fidelity) and 7.5 ips on instrument buses (for character). Of course, rules are there to be broken, but switching to 7.5 ips on a vocal, for instance, can imbue it with a vibey vintage warmth.
Try 15 ips when you want clarity and subtle glue; 7.5 ips when you're after a thicker, saturated vintage vibe.
In practice, though, things aren’t quite so predictable. Different sources react differently to the J37, and the “expected” outcome isn’t always what you actually get. Sometimes the low-end weight shows up on a different formula or speed than you’d assume, and sometimes the smoother top end comes from a setting that shouldn’t work on paper. The point is: it’s worth trying a few combinations. Don’t follow a strict rulebook here – flip the speed, change the formula, and let your ears decide what works.
Input/Output Levels and Saturation Behavior
A hallmark of analogue tape is its forgiving saturation when driven hard, and the J37 plugin provides multiple ways to dial it in.
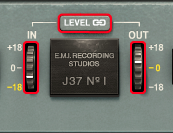
In a useful adaptation for modern workflows, the plugin provides IN / OUT level controls (and switchable metering) with ± 18 dB adjustment from unity on both. Hitting the input hotter will ‘drive’ the tape harder, giving you more saturation – and the J37’s saturation comes in the form of a smooth, musically pleasing distortion. Waves smartly includes a LEVEL link option (enabled by default) that automatically compensates the output when you adjust the input. This means you can crank the input into the ‘red’ to get that rich tape coloration and compression, without the output volume jumping and fooling your ear. It’s an invitation to experiment: as you increase input gain, listen for transients (like drum hits) softening and the overall signal getting a touch ‘fatter’ and harmonically richer.
A nice design touch in the plugin is how Waves have repurposed the J37’s original little knurled wheels. On the hardware, these didn’t control input or output at all - the right operated a magnetic shield to protect the tape from stray magnetic fields that might be present in the room thereby improving signal-to-noise, and the left wheel physically lifted the tape away from the erase and record heads.
There’s also a dedicated SAT (saturation) knob – a separate control that adds an extra layer of a different type of distortion on demand. This functions like an ‘overdrive’ circuit and can be great for when you want even more harmonic crunch or fuzz beyond what driving the Input harder can provide.
Used subtly, these tools impart the ‘glue’ and cohesion analogue tape is known for – transient peaks get shaved down, and the sound becomes a bit more cohesive and warm as the tape’s natural compression kicks in. Since the saturation has no fixed time constants, (unlike a compressor’s attack/release), it doesn’t introduce pumping or obvious compression artefacts, so dynamics can be tamed in a very smooth, organic way. Just watch how saturated you’re making things – you could be better off with a compressor, depending on what you’re aiming for.
Heavy-handed use of saturation, either by using the dedicated knob or driving the input hard, can produce plenty of audible distortion (just like slamming real tape too hard), but the distortion remains relatively rounded. That means you can push the J37 for effect – for example, saturating a snare drum or bass – and get an aggressive analogue crunch that still sounds musical.
The IN/OUT and SAT controls together give you a wide range of saturation colour, from subtle thickness to all-out overdrive, and thanks to the level-link, it’s easy to A/B your settings at equal loudness. Don’t be afraid to experiment with driving the J37 - unlike digital clipping at 0 dBFS, tape-style saturation can be very forgiving and pleasing to listen to.
Headroom and Operating Level
In analogue tape terms, headroom refers to how much level the tape can take before it starts to saturate or distort. Different tape formulations offer different maximum flux levels before saturation sets in, and tape machines are calibrated to a chosen operating level – expressed in nanowebers per metre (nWb/m). That nWb/m figure isn’t the headroom itself; it’s the reference flux level the machine is aligned to. But the choice of operating level does influence how much useable headroom you have before the tape overloads. Push the operating level too high and you’ll hit saturation earlier; set it too low and you leave headroom unused while bringing tape hiss closer to the signal.
nWb/m stands for nano-Webers per metre, and it’s simply a way of saying how strongly the tape is being magnetised when you record onto it.

In the analogue world, every studio tape machine has to be aligned so that when you hit 0 VU on the meters, the tape is magnetised to a known reference level. That reference level is expressed in nWb/m.

Think of it like this:

- The tape can only hold so much magnetisation before it distorts.

- The engineer chooses how much magnetisation = “0 VU” on the machine's meters.

- nWb/m is the number that tells you what “0 VU” actually means in terms of tape magnetisation.

Higher-rated tape formulas can handle more magnetisation (higher nWb/m) before distorting, which means they offer more usable headroom.
Lower-rated tapes saturate earlier.

So:

- Tape manufacturer: “This tape sounds best around 320 nWb/m.”

- Studio engineer: Aligns the machine so 0 VU = 320 nWb/m.

- Now everything is consistent: hotter signal, lower hiss, predictable headroom.

You never “see” nWb/m during mixing - but it’s a crucial part of making one tape machine behave like another and making the tape sound its best.
Engineers have always walked that fine line between warmth and noise. And while the J37 plugin doesn’t expose a “headroom” control directly, it simulates the real behaviour through tape formula, bias, and a fixed virtual calibration. For example, the EMI 815 tape formula behaves like a higher-output tape – it stays cleaner at the same level – whereas 888 saturates sooner. Switch between them at the same input level and you’ll hear 888 compress and distort more readily: that’s the difference in effective headroom.
Tape speed plays into this as well. At 15 ips you generally get a little more level before things break up, whereas 7.5 ips tends to saturate earlier and sound thicker and more coloured.
Because the plugin’s virtual machine is calibrated internally (to an equivalent of a typical analogue reference such as 185 nWb/m or similar), 0 VU inside J37 corresponds to a specific digital level. You can’t change that calibration, but you can manage headroom by how hard you drive the plugin. If it’s breaking up too easily, pull the DAW level or the IN control back. If you want more colour, push it.
In practice, headroom in the plugin is an “invisible” parameter exposed by input level, tape formula and IPS. There’s always a sweet spot: hot enough to give you that tape mojo, but not so hot that it turns into fuzzy distortion. Where that sweet spot sits depends on your source peaks and the tape/settings you choose.
A good workflow is to start with moderate input (around -3 to 0 VU on peaks), choose a tape formula, then raise the input level until you just hear the sound getting pleasantly thicker - that’s your tape’s headroom threshold. For even more saturation beyond that, engage the saturation knob as needed.

Remember that headroom also interacts with bias, which we’ll look at next - bias can effectively alter the headroom for high frequencies.
Bias: Clarity vs. Color
The BIAS control on the J37 is a somewhat technical, but powerful feature. Bias refers to an ultrasonic tone (approx. 80 kHz in the original machine1) used during recording to linearise the tape’s response.
Adjusting bias on a real tape machine affects the fidelity and distortion: under-biasing (lower bias current) yields more high-frequency output but also more distortion, while over-biasing (higher bias current) reduces distortion at the expense of some high-frequency dulling.
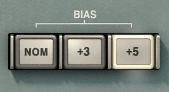
In the J37 plugin, the BIAS switches let you fine-tune the bias level just like an engineer could on the hardware. Options are available for NOM (Nominal – Abbey Road’s standard calibrated alignment which balanced distortion and frequency response for their preferred tape) +3 and +5.
On the face of it, there’s no obvious way to under-bias the machine, but after experimenting with the controls, it became clear that the +5 setting behaves more like an under-bias switch: with most combinations of tape formula and speed, +5 lifts the top end and makes things sound brighter and slightly colder compared to NOM. The +3 switch behaves as expected – it over-biases the tape and gently warms the audio.
Beyond the function of Bias as a technical calibration tool, it’s a powerful tool for adjusting sonic colour.
Want a crisper top-end on a track? Try under-biasing a touch (turn bias down, so, counterintuitively, +5 on the J37 plugin) – you might hear a hint more air or sizzle, alongside a bit more grit. Want the smoothest, cleanest saturation? Switch the bias to +3, over-biasing the machine a little – you’ll tame harshness and shave off some treble, which can be great on brittle digital mixes. With machines that allow for more adjustment, extreme bias changes can sound odd (too under-biased might get harsh, too over-biased can muffle things), so small tweaks are usually best. The J37 manual notes that bias interacts with tape speed and formula; and I found this to be the case – the audible effects of the bias switches vary a little.
Try auditioning bias settings while listening to something with rich high-frequency content (like cymbals or sibilant vocals) - you’ll notice the brightness change, helping you to select the right amount of sheen vs. smoothness.
In essence, bias is a fine-tuning control between clarity and colour: lower bias gives you a brighter sound with more harmonic grit (+5, in the case of the plugin), while higher bias (+3 here) produces a darker, smoother result with reduced distortion. Sadly I don’t own a real J37 to judge how the plugin responds to changes in Bias compared to the hardware, but it’s definitely a useful tone-shaping tool, adding extra flexibility and creative range to the plugin.
Wow, Flutter & Noise – Vintage Quirks on Tap
No vintage tape machine would be complete without its quirks, and the J37 plugin includes dedicated controls for WOW, FLUTTER, and NOISE (tape hiss) to emulate them.
On real machines, wow and flutter are simply speed and amplitude fluctuations respectively, caused by tiny imperfections in the tape transport. As the original Studer J37 manual explains, these often come from parts that don’t rotate perfectly centrally (but ought to) – such as slightly off-centre shafts or idler wheels. When a rotating part wobbles like this, it makes the tape speed rise and fall in a smooth, cyclical way, which creates the slow, wave-like movement we hear as wow. By contrast, worn or dirty bearings create small, uneven bumps in the tape’s movement, leading to the faster, more jittery instability known as flutter.
Even high-end decks like the Studer J37 were never completely free of these fluctuations; they were engineered to keep them extremely low, but a little was always there; and that tiny bit of movement – the subtle, mechanical inconsistency – is part of what gives analogue tape its recognisable character.
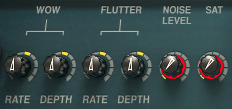
In the plugin, you can dial in wow and flutter RATE and DEPTH to increase (or reduce) these fluctuations intentionally. The plugin’s default settings has them at the negligible levels measured on Abbey Road’s actual machine (since most people don’t want obvious pitch warble on every track), but for a touch more vintage vibe you might like to boost them by a tiny amount – an almost inaudible slow wander and quicker wobble that can make sustained notes feel more alive.
Some mixers prefer to keep wow and flutter to an absolute minimum on the mix bus (to retain transparency) but will enable mild settings on individual instruments for effect. Of course, you can also crank wow/flutter to extreme levels for creative effect – essentially using the J37 as a warbly lo-fi processor for an old tape vibe or psychedelic wow-flutter extravaganza.
Analogue tape is inherently noisy, due to the hiss of the tape particles and electronics. The J37 plugin includes a NOISE level pot that adds modelled tape hiss.
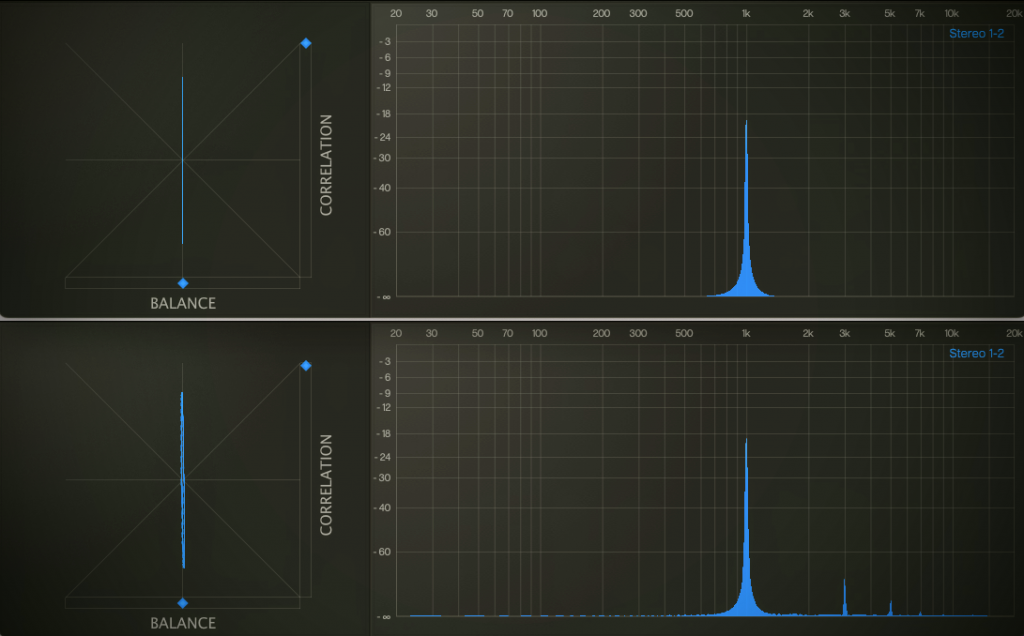
With some noise added, the noise characteristics of the different tape formulations can be heard: the 815 formulation at 15ips has noticeably less HF content compared to the 888 at 7.5ips. Hearing the noise types, I thought I’d capture a spectrum analysis of the varying noise profiles, but the audible difference is far more pronounced than the visual one, and so there’s not a lot to be gained by seeing it.
With the NOISE pot set to the OFF position, there’s no noise at all, which is my default setting, (unless I specifically want the noise floor for atmosphere), as accumulated hiss across multiple tracks can quickly build up; but there is something psychologically satisfying about hitting stop and hearing a gentle hiss in the background, exactly as you’d hear in an analogue studio! And for sound design or retro productions, adding noise can make a digital mix feel a bit more ‘alive.’
Wow and flutter can be used sparingly to impart analogue depth and movement, or exaggerated for special effects; tape noise is there if you need vintage credentials or subtle glue (noise can psychoacoustically glue a mix), but it’s optional if you prefer a cleaner output.
Modelled Tracks: Subtle Channel Variations for Extra Realism
One small but useful extra feature of the J37 is the ‘Modeled Tracks’ selector, which lets you choose between three options for virtual “tracks”; each with slightly different characteristics.
On the real Studer J37, no two channels were ever perfectly identical – tiny differences in calibration, head alignment, electronics, and wear meant each track had its own miniature fingerprint. Waves have modelled these nuances so you can pick the flavour you prefer.
The differences are subtle – we’re talking tiny shifts in stereo width, timing and tone – but on a stereo or mix bus instance, switching ‘tracks’ can have a clearly audible effect; mainly on width. Some tracks feel wider, some a touch tighter in the centre, and some seem to smooth transients slightly more. It’s not dramatic, and it’s not the kind of thing that would jump out at you in a blind test, but when you’re trying to dial in the minutiae of tape vibe details, these little variations can make a tangible difference.
I find the ‘Modeled Tracks’ options most useful on the mix bus and individual instruments which contain lots of stereo information: flipping through the tracks can give new perspectives, and sometimes subtle asymmetries that read as more analogue, lived-in, or just more interesting to the ear. It’s a quick A/B tool – almost like cycling through calibrated channels on a real machine until one just clicks with the material. It’s not a headline feature, but it’s a nice detail, and quite in keeping with the Abbey Road modelling philosophy: don’t just emulate the machine – emulate its personality quirks too.
Authentic Tape Warmth & Dynamic Response
All this technical talk of bias, formulas, and flutter boils down to one thing: audio character. So what does the J37 actually sound like?
Well, it brings warmth and cohesion – often in a way you feel more than explicitly hear. The effect can be very subtle at conservative settings: for instance, inserting the J37 with a 70’s tape formula and saturation barely tickling will just take the ‘digital edge’ off a track, mildly rounding transients and lightly glueing frequencies together in a pleasing way. On a mix bus, this might translate to a mix that feels less sterile – the low end tightens up, the high end smooths out, and there’s a slight compression that makes the mix sound more cohesive as a whole.
With vibier settings – an older tape formulation, pushing the input level a bit more – on individual sources, the changes can be more obvious: drums might ‘fatten up’, gain a nice analogue smack and smooth over the hi-hat transients, vocals can acquire a subtle compression and thickness that helps them sit in the mix, and DI instruments (like software synths or in-the-box pianos) can gain a sense of depth and realism, as if they were recorded in an older analogue way.
Push the plugin harder, and you move from subtle polish into the realm of audible saturation and colour – which can be fantastic for certain genres. For example, driving the J37 on a drum bus can add a crunchy 60s rock vibe, complete with a bit of grit on the snare hits and natural taming of kick drum peaks. Guitars and keyboards can be enlivened with a mild tape distortion that gives them weight and attitude. Formerly thin digital tracks can feel as though they gain additional depth, cohesion, and life; and harsh digital artefacts can lessen.
The harmonic distortion (rich in musically pleasing overtones), the gentle compression, the possible flutter and noise – all combine to simulate the experience of analogue tape; and importantly, the J37 does it without radically altering your source unless you want it to.
It’s perfectly possible to dial in just a ‘touch’ of tape, with no obvious distortion or noise, yet perceive the mix as warmer and more glued. This dynamic, forgiving response (no brick-wall clipping, no sterile limiting) is why the J37 can be so effective on the mix bus for final polish – just inserting it with default settings and maybe trying the two tape speeds, the bias options and the modelled tracks (which can alter stereo width/timing) can already impart a subtle analogue sheen.
For me, moderation is key: piling tape saturation on every track can lead to muddiness and the mix losing impact; but used judiciously, the Abbey Road J37 earns its place in the plugins folder. It gives present-day producers access to the celebrated vintage Abbey Road tape sound that can help to make a mix feel more alive and musical.
In a crowded plugin market the J37 still stands out for its combination of flexible sound sculpting, sweet analogue character, and beautiful interface. Whether you’re chasing a retro vibe or just trying to remove some digital coldness from a track, the J37 delivers dynamic glue and multiple flavours of tape warmth.
In Use: Mixing with the J37
The true test of any plugin is how it helps your mixes. The J37 shines as a cross-genre workhorse. Here are some real-world application notes from my experience, and some common use cases:
On Drums (Glue, Punch, & Fatness):
One of my go-to uses for the plugin is to slap the J37 across a drum bus, and it rarely disappoints. It thickens the kit a little – the kick gets a bit rounder, the snare a touch fuller, and the overall kit gels together.
Hitting the drum bus at 15 ips, bias NOM, formula 815 (for a clean approach) can add a nice low-end bump around 50-60 Hz that makes kick drums more solid, and it can slightly tame the harshness of the cymbals. If I want more grit or ’70s rock’ character, dropping to 7.5 ips and maybe using the 888 tape formula can give a grungier, thicker tone – great for beefing up a thin snare or adding heft to toms (it’s like instant tape mojo on overly clean drum recordings).
Inserting the J37 on each drum track individually (which lets you saturate kick, snare, etc. separately), or bussing all drums to one instance can both work; individually, you can drive certain drums harder. On a drum bus, the glue effect is more pronounced.
‘I also like engaging a tiny bit of wow/flutter on a drum room mic for vibe – too much gets weird, but just a touch can make the room sound cool.
The transient smoothing is especially helpful on drums that feel too spiky; J37 kind of rounds off the razor edges.
Parallel processing works too: duplicate a drum track, slam J37 on the duplicate with heavy saturation, noise, etc., and blend it under the clean track – instant parallel tape compression (great on snare drum or overheads to bring out room tone).
In EDM or hip-hop, the J37 can take a sterile 808 hi-hat loop and make it sit nicer in the mix by dulling the super highs just a hair and adding body.
On Bass:
Bass instruments love tape saturation, the J37 included. A clean DI bass that’s peaky and thin can become rounder and more solid with the J37. I often set it to 15 ips (to keep some clear top end for bass finger noise or pick attack) and push the input until the VU is hovering around 0, bias tweaked to taste. I find a bit of tape compression like this can help some basses to sit better in the mix. It’s like the low notes get a bit denser.
I do find that if you push too hard though, the low frequencies will saturate disproportionately, so it’s a balance: moderate input and maybe a very light touch of the SAT knob will give you a rich, warm bass; going ham on it might be better reserved for a fuzzed-out indie rock bass effect.
On synth basses or sub-bass, the J37 can add harmonics that help them cut through on small speakers (tape naturally generates upper harmonics). The J37 handles bass nicely if not pushed into full saturation, and I’ve replaced dedicated bass saturation plugins with the J37 in some mixes because it gives me the colour I want along with a little bit of compression.
It’s also worth trying on a synth bass that’s too clean/sterile; the J37 can impart an analogue synth vibe, especially if you play with wow/flutter to simulate the slight instability of analogue oscillators.
On Synths & Keys:
In genres from pop to EDM to hip-hop, virtual synths and soft samplers can sometimes sound too ‘clean‘ or ‘digital‘. In these cases, the J37 is an excellent option for giving synths an ‘analogue vibe’. I often put it on software electric pianos too (Rhodes & Wurlitzers); the tape saturation makes can help give them more of a ’70s vibe.
With a bit of flutter for movement and some saturation for warmth, a plain soft-synth pad can become a lush, vintage-sounding pad. Automating the Wow Rate knob synced to tempo to create a subtle rhythmic pitch LFO on a sustained synth can make for a cool effect too – it’s like adding a moving filter that gives a bit more life to a boring held note.
Synth basses benefit similarly to electric bass – a bit of tape can prevent them from sounding overly clinical.
In one mix, I had a sterile MIDI strings pad; running it through a J37 with 7.5 ips/888 formula turned it into a vibey, kind of Mellotron-esque thing – much more characterful.
Also, for EDM leads or digital plucks, tape saturation can take the edge off and make them sit more nicely with vocals.
Whether you produce Lo-fi beats or chart pop, you’ll find some use for the J37 on keys and synths, even if just subtly. It’s like adding a ‘cozy blanket of analogue goodness’ over cold sounds.
On Guitars (Electric & Acoustic):
Guitars often benefit from a touch of tape, especially if they’re recorded DI or with amp sims.
I’ve run clean strats through a J37 to great effect – it smooths out the high-end fizz that amp simulators sometimes have, and makes the guitar sound more ‘recorded’.
For distorted electric guitars, tape can help tame fizz and glue multi-tracked guitars together. I had a scenario with multiple heavy guitar tracks that sounded a bit raw; putting a J37 on the guitar bus at 7.5 ips, formula 811, added a subtle saturation that gelled the layers and took the edge off the extreme highs without losing crunch. It’s almost like a very gentle lowpass filter + compressor, but even more pleasing to listen to in the right circumstances.
On acoustic guitar, a J37 at 15 ips, 815 formula, bias +3 can be lovely – it rounds out transients (smoothing overly harsh pick attacks a little) and adds a bit of body. One caution with acoustics though: if there are big dynamic swings, watch that you’re not over-saturating the loud strums (or automate the input).
For lead guitars or solos, the J37 can add sustain; notes bloom a bit as the tape compresses them. And here’s a creative trick: use the tape delay in the J37 for guitar echoes. For example, a slapback delay on a rockabilly guitar track using J37’s delay (Mode: Slap, ~120 ms, some high-frequency roll-off) is chef’s kiss for vintage vibes – it’s exactly the kind of tape slapback Scotty Moore or John Lennon would approve of.
Or try the Ping-Pong mode on a clean guitar arpeggio – it’ll bounce the echoes left-right and create a wide, immersive guitar part with analogue-flavoured repeats; adjust the delay’s filters to taste.
You can even mimic ADT (Artificial Double Tracking) on a guitar solo: duplicate the track, put a J37 on the duplicate, set a very short delay (e.g. 30 ms) with Wow depth modulating slightly, and mix it under the original – you’ll get that slight flange/chorus of a doubled part, like the Abbey Road engineers did manually in the ’60s. In fact, there’s a Waves video showing that by ‘changing the delay settings and wow and flutter,’ you can essentially use J37 as a tape flanger/chorus unit. Don’t overlook it for creative sound design!
On Vocals:
Using tape on vocals can be transformative when done subtly. For a lead vocal that’s a bit harsh or sibilant, the J37 can smooth out the top end gently and add a touch of thickness. If I’m going to use it, I’ll always experiment with tape speed and formulations as every vocalist and vocal recording will respond differently: the key is to listen across the entire song – vocals are dynamic, and you might have a perfectly saturated verse vocal that turns into an over-saturated, slightly distorted chorus if the singer starts belting it out.
The Abbey Road team specifically warns:
Be sure to listen throughout the entire track… you may have the perfect saturation on the verse, then the chorus hits and it causes distortion you might not want
AbbeyRoad.com
The solution is to lighten up on the IN/SAT so even the loud parts are safe, use automation to back off the input gain on intense sections, or mult out the tracks and process by section. Thankfully, the Level Link makes level automation easy since you’re mainly adjusting color, not loudness.
When set right, the J37 can make a vocal sound like it was recorded through more expensive gear – a bit of ‘warmth and glue’ that can help it sit in the mix, especially in digital-heavy productions.
It’s particularly nice on background vocals or vocal stacks; you can tape-saturate BGVs a bit more to tuck them behind the lead vocal, rounding them so they don’t poke out.
Also, don’t forget the delay: a little tape slapback on a vocal can be magic. Try 80-150 ms on J37’s delay, mix to taste – it gives depth and an old-school vibe (John Lennon famously loved slapback on his vocals, often done with real tape). The high-pass filter can keep the slap from muddying the low end, and a bit of feedback can even give you a repeating echo that decays with that nice tape warmth.
For modern pop/R&B vocals, you might not want obvious slapback – but a short 30 ms unsynced delay with zero feedback, mixed low, can act like an automatic double-track, adding width. That, combined with a few % of wow/flutter, can impart a very subtle moving texture to a vocal that’s felt more than heard.
On the Mix Bus / Master:
Many people love to put tape emulations on the stereo bus for a final bit of glue. The J37 can excel here if used gently.
Typically, I’m choosing 15 ips (for minimal high roll-off), the 815 or 811 tape (for cleaner sound), bias NOM (or maybe +3), and drive it just until you see occasional VU needle movement. The goal is not to audibly distort the whole mix, but to sweeten and bind it. The difference is subtle but real: with the J37 everything gets glued together a little bit, and mixes can sound a touch more cohesive. It’s not a magic bullet, but on a mix that’s already 95% there, the J37 can help to get it over the line. The snare tucks in a touch, the vocals blend a hair better with the instruments. It’s easy to overdo it though – the sweet spot is often just before you hear obvious saturation.
Also, be mindful of loud song sections: if the chorus is much louder, that’s where tape saturation will show its effect first. Using automation on the input can really help to keep it consistent.
Another tip is to bypass and compare often – make sure the J37 is improving the sound and not just changing it. When used right, it should enhance the mix without screaming ‘I’m here.’ Compared to Waves’ Kramer Master Tape I find J37 on the mix bus gives me more tweakability of the flavours that I like. If I want a super transparent mix, I might just leave it off; but for rock, lo-fi, or anything that wants a hint of vintage glue, J37 can be an awesome finishing touch.
Some more cool things to try with the J37:
Tape Flanging/Phasing: The Beatles pioneered flanging using dual tape machines, and you can create a similar effect. Try duplicating a track, put a J37 on the duplicate, and set a very short delay (e.g. 5-20 ms) in Send mode, then automate the delay time slowly or use Wow for movement. Mixing this delayed track with the original makes for a classic tape flange/ADT sweep, the J37 introducing the right kind of phasey artefacts.
Saturated Delay Throws: Using the J37 on an aux, you can create amazing delay throws (e.g. on the last word of a vocal line) that not only echo but get dirtier each repeat. Crank the SAT knob, maybe set Feedback mode with medium feedback – the echoes will degrade like old tape; think Pink Floyd ‘dub’ style echoes.
Lo-Fi Maker: Want that Boards of Canada or vintage cassette vibe? Try 7.5 ips + 888 tape, WOW depth high with a slow rate, NOISE turned up, maybe even deliberately set BIAS to +5 (remember, this is an under-bias setting on the plugin) for more distortion, and run a soft pad or sample through it for instant nostalgia. It’ll sound like something off a 40-year-old tape you found in the garage – which for some genres (lo-fi hip hop, indie) is gold.
The J37 is versatile. It’s definitely not a ‘same-preset-every-time’ type plugin. It encourages experimentation – trying different formulas, delays, bias settings and track modelling.
Despite being a digital plugin, it inspires analogue mindset experimentation (twiddling knobs and seeing what happens), which is a lot of fun. And importantly, it’s stable and not too heavy on the CPU.
Summary
The Waves Abbey Road J37 Tape does a solid job of translating the revered glue and warmth, and the sound-sculpting tweakability of analogue tape into the digital domain, whilst providing some nice creative features.
In daily mixing, it tends to be the kind of plugin you instantiate and then forget is there – until you bypass it and realize how much it was actually doing.
Once you get to know it, the workflow is effortless. It’s equally at home subtly polishing a master bus as it is driving a dirty lo-fi breakdown or creating a slapback echo on a vocal.
The sound is convincingly analogue – warm, cohesive, and forgiving – but there’s precision there too (bias, calibration, tape formulas) if you want it. Is it the very ‘best’ tape plugin out there? Tape emulations are subjective – some prefer one flavour over another – but the J37 has earned a reputation as a go-to, and it’s easy to see why. It strikes a great balance between authenticity, versatility, and ease of use; plus, at its current price, (yes, we’re approaching Black Friday as I write, but it’s usually on sale for a bargain price), it’s a no-brainer addition to any mixing toolkit if you’re craving analogue vibe.
In an era where we can sometimes get lost in endless digital options, the J37 is a refreshing nod to classic recording wisdom: sometimes, running your tracks through a good piece of tape (or a great emulation of it) is the magic touch that makes everything feel just right.
Further reading
There’s a brilliant article here about the history of the different EMI tape formulations:
http://www.museumofmastertapereels.org/emi-tape-history.html
The Studer J37 manual is well worth a read, if that sort of thing interests you:
https://www.thehistoryofrecording.com/Manuals/Studer/J37_Op_Serv.pdf
Waves’ Abbey Road J37 Tape can be purchased through the Waves website on its own, as part of the Abbey Road Collection bundle (amongst others) or accessed via their Waves Ultimate monthly subscription plan:
https://www.waves.com/plugins/j37-tape
The excellent (as always) manual is available here:
https://assets.wavescdn.com/pdf/plugins/j37-tape.pdf
Footnotes
- Source: Studer J37 manual, section D 2 – Oscillator ↩︎